Friday, April 29, 2011

Pip pip cheerio!

In honor of the Royal Wedding I thought I'd put up a few pics of the trip we took to London for our honeymoon in August 2009. We have all the typical touristy photos that most everyone has when they visit London so I thought I'd add a few atypical shots.

 Of course you have to have the requisite red telephone box shot!

 Tower Bridge


 The skies were dark and tumultuous most of the time we were in London.

...and another requisite shot of Big Ben.


 One odd thing we noticed was that there weren't any
trash cans anywhere along the streets but they did have
a place for your gum and butts on every corner! Strange.


 The Anchor, an old historic pub that was rebuilt in 1676 after a fire, is located on the
south bank of the Thames down the way from Shakespeare's Globe Theatre.


 Just had to take a picture of this sign located near the
Prince Albert memorial in Hyde Park. Not sure what the 
heck it's supposed to mean!? Caution alien crossing?

Thursday, April 28, 2011

Make a fab fascinator in celebration of the Royal Wedding!

Yep, I'm one of "those" people obsessed with the Royal Wedding. I love Kate Middleton! She's everything I think a princess should be- classic, beautiful, fresh and elegant. I can't wait to see all the pomp and circumstance, the fashion, hats, jewels, crowns and the dress!

In honor of Kate I thought I'd make one of her favorite accessories- the fascinator hat. I love these little hats but unless you're British royalty you really can't pull off just randomly wearing one of these lovely, crazy pieces. However, what better time than now to make one of these fun hats and sport it while watching the Royal Wedding.

The design of my fascinator was inspired by this Kate Middleton piece:


Using a thick and stiff piece of black felt I cut an oval out. Then I cut a slit in one end, overlapped the edges of the slit and glued them together with a glue gun. This creates a curve in the felt piece so that it forms to your head.


Earlier I made a trip to my local craft store to pick up a bag of feathers. I ended up getting these feather cuffs because I liked the fullness and floppiness of the feathers and I especially like the varied lengths of the feathers.


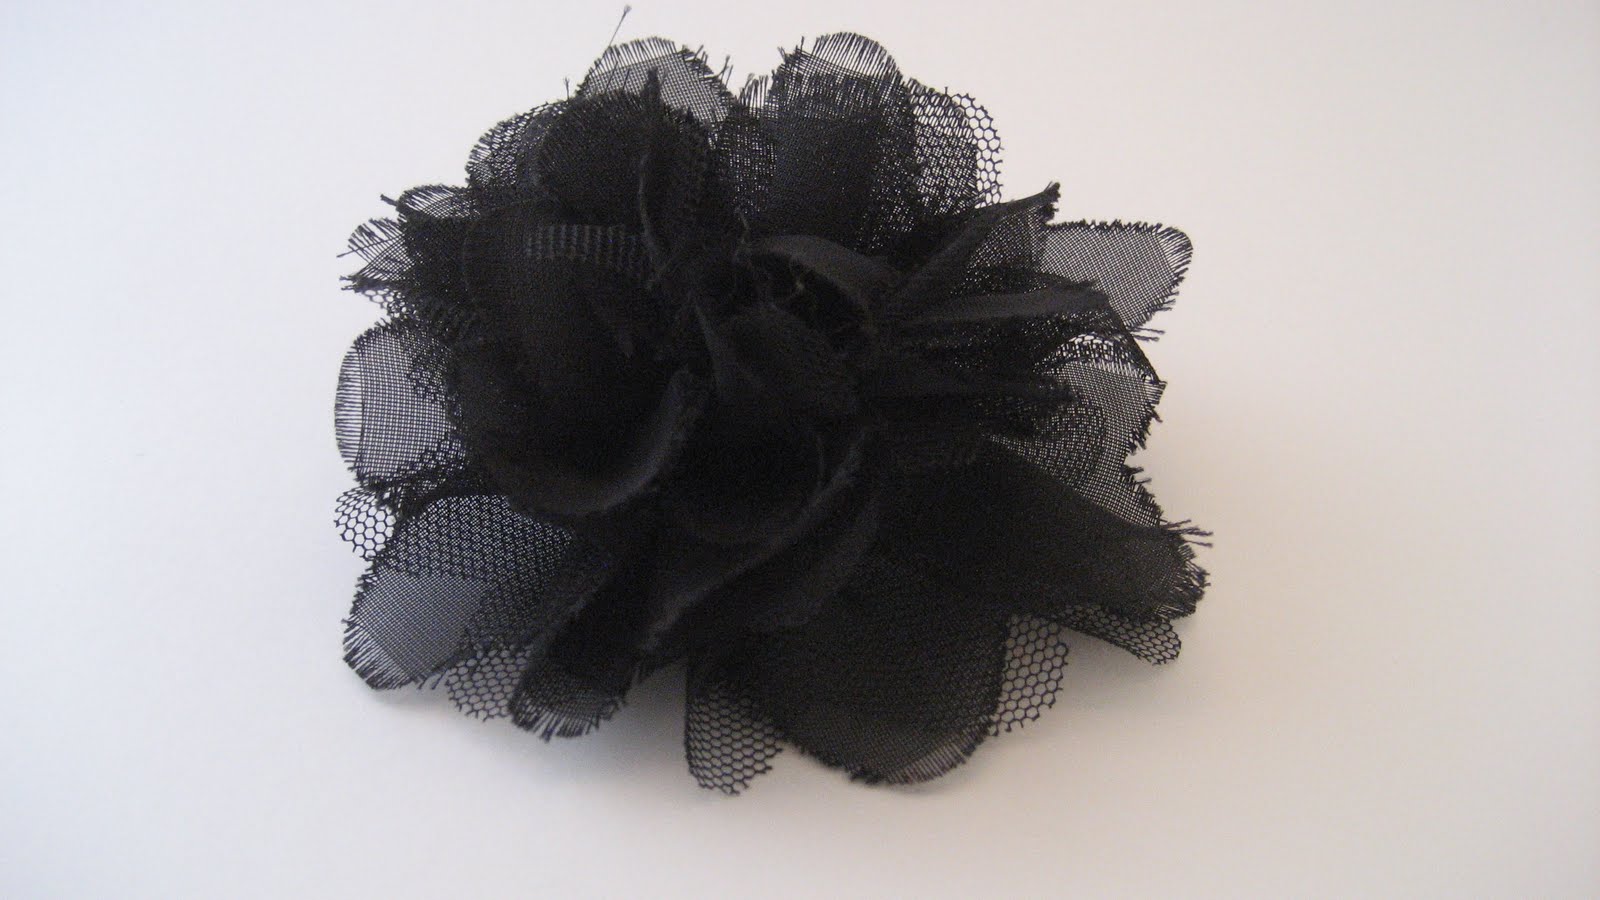
I got this black tulle flower pin on a sweater I purchased a few years back. I thought I'd use it on the front of the fascinator to break up the look of the feathers.


I started by gluing one of the feather cuffs to the front of the felt oval. (The front is the end that you cut the slit in and glued.) The second feather cuff I glued behind the first.


Then I just pinned my tulle flower brooch to the front of feathers. I didn't glue it down because I wanted to have the option to use it later.


Next I cut five strips of felt out and attached each end of each strip to the back of the feather piece. I glued three horizontally down the middle and two vertically along the sides. Using bobby pins I will use these strips to help secure the fascinator to my head.


Voila! You're done. It's that fast and easy. A fab fascinator head piece to wear while you sip tea and watch the Royal Wedding. Enjoy and pip pip cheerio!


Check out these crazy but fun fascinators!

Wednesday, April 27, 2011

Wedding photo booth/area


Photo booths are super popular at weddings nowadays. Not only do they provide your guests with something to do between drinking, dancing and feasting on cake but they also leave you with hilarious, long lasting memories of your crazy, silly, weird family and friends. And who doesn't LOVE that!?!?

For our wedding, instead of bringing in a photo booth we went with a photo area using rustic doors on the outdoor terrace as a backdrop. We set the camera up on a tri-pod with a remote control, purchased a and rented a projector that projected the image that was previously taken up onto a nearby wall.

pic name

pic name

pic name

pic name

We used my Nikon D80  and purchased the remote online. The projector was rented for the day for $150 from a local Santa Barbara camera shop, we also purchased the light kit there which cost us about $150.

Advantages of using a photo area instead of renting a photo booth (like the kind you sit in at the mall) are that you (obviously) have more space to pose and more people can be in each photo. But the biggest plus in my mind is that you're using a remote control to trigger when you want a picture taken. That allows you to capture photos just when you want them. Here are just a few of the 100's of fun photos we ended up with.


The photo area was a hit and so much fun, everyone seemed to really love it. We got the idea from a friends wedding we attended a few years before. It was such a great idea that when we got engaged we immediately decided to have the same thing at our wedding.

And the tradition of the photo area continues on... my husband is currently hard at work planning the photo booth for his little sister's upcoming wedding in October. He's amping the concept up, making it even more fun and interactive than before. It's going to be great, can't wait to share the details later with y'all!

Tuesday, April 26, 2011

Dreaming of Summer

Dreaming of Summer


I'm over Spring. Over it. It's raining, there are still no leaves on the trees and I've finally realized that Spring is never coming. So I've moved on to Dreaming of Summer. Here's a style inspiration board I put together for myself. I made it on Polyvore which is an amazing website where you can put together the coolest fashion boards. Best of all the photos are linked directly to the website where you can purchase the items, making it easy for you and your readers to find your inspirations!

I did a very basic board my first time around but there are all sorts of backgrounds and templates to choose from that enable you to make your boards look like they're straight from a fashion magazine. So fun you gotta try it!

I used to rock a dress just like the striped turquoise/white one except it was awesomely 80's styled. Wish I could find a picture of it to upload. I think I rocked it with white pumps and giant 80's permed hair. Ha! My favorite combo is the orange dress with the clutch- so cute and affordable! The dress is from TopShop (one of my favorite stores!) and is only $40!

Along with coordinating heels I also selected a pair of flat sandals for each outfit. Everyone knows I love the super high heels but I always make sure I have a pair of flat shoes in my bag in the off chance that I need them. I always say that I could run a mile in my heels and I really think that I could but it's always nice to have a coordinating and comfy pair of shoes if need be. My favorite flat sandals on this board are the nude ones. They go with anything and they have little skulls on the top of the them!

Dreaming of Summer by janyclaire 
Bustier dress
70 GBP - warehouse.co.uk

Silk dress
$368 - aliceandolivia.com

Forever21 strappy wedge
$26 - forever21.com

Carvela stiletto high heels
$233 - asos.com

Alexander McQueen leather high heels
420 EUR - montaignemarket.com

Espadrilles wedge
$27 - tillys.com

Gucci platform high heels
$995 - bergdorfgoodman.com

TopShop toe loop sandal
$75 - topshop.com

Burberry leather tote
$1,395 - burberry.com

Turquoise handbag
$40 - mimiboutique.com

Linea pelle handbag
$165 - lpcollection.com