Showing posts with label Wedding. Show all posts

Thursday, February 2, 2012

An elegant modern wedding

All photos by Ron Shuller Creative Images Photography.

My sister-in-law Julie was married on October 1st in Cincinnati. (See the flip flop cupcakes I made for her wedding shower here.) Even though I was super, duper pregnant (due on October 16th) nothing short of my water breaking was going to keep me from going. We hit the road the day before in just enough time to make it to the rehearsal dinner. The nomally 5 hour drive turned into an 8 hour drive though when we realized after two hours on the road that we had left our wedding outfits (my dress and Dave's suit) at home! Asleep in the car I suddenly just sat up and screamed "Our clothes are in the closet!". Talk about serious Pregnancy Brain! We barely made it to the dinner, making it there just a minute or two before it started.


Julie and Joe were married at Alms Park in front of a pergola that framed an incredible view of the Ohio River. Weather in Ohio in October is very unpredictable to say the least. That day it was overcast and cold with rain threatening all day. When we arrived at the ceremony site it started to sprinkle and everyone started to worry that the sky would open up on us. More than ourselves though we were all really worried for Julie. We wanted her day to go off without a hitch, without a drop of rain on her parade! Just as I thought it was about to pour the ceremony started, everyone was distracted by the beautiful, glowing bride and then before you know it Joe was kissing the bride and it was all over before one drop even fell! Thank goodness!

Our nephews Cole and Jack were ushers and presented the rings during the ceremony. They looked so dapper in their tuxedos!


The reception was held at the Cincinnati Club. The club is a throw back to mens clubs of the past with an ornate staircase leading to the upstairs venue and decadent marble columns and floors. Elaborate lighting, decor and flowers transformed the cocktail and reception rooms into elegant spaces with a hip urban city vibe.


All the weddings I've ever been to have been during the summer. I was so excited for my first Fall wedding because I just love the rich, jewel tone hues that come with Fall and Winter weddings! (See my peacock inspired jewel toned wedding mood board here.) Julie's colors were dark gunmetal grey and a rich deep purple. So perfect! Dave and I dressed accordingly...


One thing that stood out as really unique and clever to me was the wedding cake. It was featured prominently in the middle of the floor at the beginning of the reception. After Joe and Julie were introduced they immediately did the whole "cutting the cake" scenario. I had never seen this done before and wondered why they decided to cut the cake right at the start of the night. Later I realized what a great idea it was when the cake was served promptly after dinner for dessert. Brilliant! Most weddings wait to cut the cake later in the night but at that point most people are too busy dancing, socializing or let's be honest too drunk to be interested in cake and it goes uneaten. I would definitely have done this at my wedding had I thought of  it!


Another really, really fab thing was the After Party held at a nearby martini bar! Oh how I wish I could have gone. Joe and Julie even went so far as to rent out part of the bar and have bottle service- so my thing! Julie and her friends even changed into cute party dresses. A martini bar, bottle service and an outfit change... so perfectly me, well me prior to having a baby anyway. Oh how times have changed! I thought maybe, just maybe I'd make it but who was I kidding? I barely made it past 9 pm, holding out just long enough to see the first dance and speeches. Ugh. I miss out on all the fun stuff. ;)

**Please vote for Julie and Joe's wedding to be featured in Venue Magazine, a Cincinnati focused lifestyle magazine! Simply go to the Venue Magazine Facebook page and click "Like" on her wedding album- Martin Maringer Wedding. Thank you!**

All photos by Ron Shuller Creative Images Photography.


Thursday, October 13, 2011

A Whimsical Woodland Tahoe Wedding


My best friend Paige was married in August in a beautiful ceremony held on a private estate near South Lake Tahoe. The estate boasts a small, clear pond and a grassy field in front of a beautiful large, log cabin home. Such an amazing, secluded location!

Paige's wedding was so, so gorgeous and so very uniquely a reflection of her and her husband Mat. Even more impressive is the fact that they did EVERYTHING themselves. By everything I mean that they literally did it all without the help of a wedding coordinator, day-of wedding coordinator or even help from a property issued event manager.

With the help of family and friends they set up their entire wedding; the reception tent, ceremony site, bar, candy bar, cupcake/cake station.. etc! Only the reception tables and food were left to be set up by the catering company. The day of her wedding, two hours before guests were scheduled to arrive, Paige was still out there answering questions, directing things and setting up. It was hectic but she was still calm, collected and focused! What a ROCK STAR!


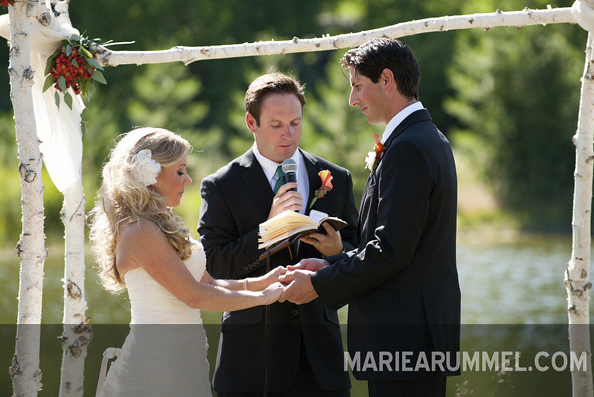
There were so many great details to this wedding. To me the most memorable will always be their actual ceremony which was different, lighthearted, fun and touching. So different from most of the formal, regular wedding vows I've heard before. Mat's childhood friend officiated the ceremony, becoming an ordained minister just so he could marry them! When I first heard this I really wasn't sure how it'd turn out and thought them both brave to trust him with such an important moment. But he absolutely did not fail. Like I said before, it ended up being so unique, touching and memorable... great job Casey!

Another favorite detail are the amazing photos of the couple in a canoe out on the pond with a Just Married sign on it taken by Marie A. Rummel Photography, a local Lake Tahoe and Sacramento based photographer. Amazing!


The next day they hosted an informal continental breakfast at the property and invited everyone to stop by, hang out and enjoy the property. A lot of people swam in the pond, took a spin around it on paddle boards, played badminton or just hung out recapping the previous night's memories.

More amazing photos from the wedding courtesy of Marie A. Rummel Photography:

 The unbelievably gorgeous bride and groom! 


Paige and me (7 months pregnant- notice my strategic flower placement!)


Monday, October 3, 2011

Flip flop cupcakes

My sister-in-law was married in Cincinnati this weekend. It was a gorgeous wedding and she was the most beautiful bride! Look for a post of all the cool details soon!

Back in July she had a beach themed wedding shower. The party was fantastic and looked great, with the beach theme definitely carried throughout. I volunteered to make flip flop cupcakes, an idea I found on a ton of websites online. They seemed pretty simple to put together, with the fondant flip flops the only thing that really required extra time.

I'd never worked with fondant before so I wasn't sure what to expect. Instead of making my own which seemed complicated and more trouble than it's worth, I picked up some pre-made fondant in the wedding/baking section at Joann's Fabric. They have a bunch of different ready made colors to choose from and even some fun patterns like zebra or leopard print.


Next I needed to find a tiny flip flop cookie cutter, one that would fit to scale on a cupcake. After looking around at several places and scouring online I realized I wasn't going to find one small enough. I ended up buying a set of oval shaped cutters of which the smallest size would make the perfect cupcake sized flip flop. Then I had Dave bend in one side of the cutter, making a dip in one side forming the flip flop shape I was looking for. I used this to make both sides, the left and right side of the sandals. I also had him shape a larger cutter into a surf board by pinching in the top of the oval to form the top of the board.

From there I just rolled out each fondant color and cut my flops out two at a time, making sure to turn over one of the sides to make a complete left, right pair.


For the straps I rolled a contrasting color out to a very, very thin tube and bent it into a v-shape. Then, using a tiny bit of water, I lightly wet the fondant where I attached the straps. Laying the strap down I pressed it into the moistened fondant then used a knife to make an impression in the middle of the strap for looks and to also help attach it.


For the sand I frosted the cupcakes with vanilla frosting and then coated each with a layer of brown sugar. After I applied the brown sugar I realized that some of it, the layer touching the frosting was melted into the frosting. I think a better option would be to use ground up graham crackers because they won't melt and will maintain more of a sand like look. Later before I put the cupcakes together I ended up applying a second layer of sugar. 

Thursday, June 9, 2011

Wedding inspiration board- Art Deco & Peacock Feathers

The very first place I considered having my wedding at was Casa Del Mar located right on the beach in Santa Monica. (Read the post about my wedding location search here!) Built in the 1920's the hotel has been fully restored to its full Art Deco glory! It is truly a gorgeous venue and lends itself perfectly to a Art Deco/Peacock/Art Nouveau type wedding.

I thought it was THE place for sure. That is until I found out that the food and beverage minimum, regardless of the size of your party, is $30,000 for a Friday or Saturday night. Um... no thank you. But of course the day after I saw it and before I had a chance to price it out I had already in my mind and on my laptop started dreaming up an inspiration board for it.

Here's the board I started before my dream was abruptly interrupted... $30K yikes!

Wednesday, April 27, 2011

Wedding photo booth/area


Photo booths are super popular at weddings nowadays. Not only do they provide your guests with something to do between drinking, dancing and feasting on cake but they also leave you with hilarious, long lasting memories of your crazy, silly, weird family and friends. And who doesn't LOVE that!?!?

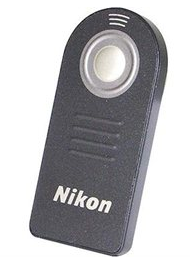
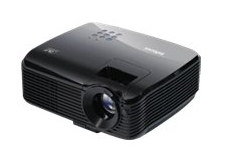
For our wedding, instead of bringing in a photo booth we went with a photo area using rustic doors on the outdoor terrace as a backdrop. We set the camera up on a tri-pod with a remote control, purchased a and rented a projector that projected the image that was previously taken up onto a nearby wall.

pic name

pic name

pic name

pic name

We used my Nikon D80  and purchased the remote online. The projector was rented for the day for $150 from a local Santa Barbara camera shop, we also purchased the light kit there which cost us about $150.

Advantages of using a photo area instead of renting a photo booth (like the kind you sit in at the mall) are that you (obviously) have more space to pose and more people can be in each photo. But the biggest plus in my mind is that you're using a remote control to trigger when you want a picture taken. That allows you to capture photos just when you want them. Here are just a few of the 100's of fun photos we ended up with.


The photo area was a hit and so much fun, everyone seemed to really love it. We got the idea from a friends wedding we attended a few years before. It was such a great idea that when we got engaged we immediately decided to have the same thing at our wedding.

And the tradition of the photo area continues on... my husband is currently hard at work planning the photo booth for his little sister's upcoming wedding in October. He's amping the concept up, making it even more fun and interactive than before. It's going to be great, can't wait to share the details later with y'all!

Thursday, March 31, 2011

Favors and fans

Wedding favors

As soon as I came across instructions for how to make pocket tissue holders on the craft website Skip To My Lou I knew I'd be making them for my wedding. I thought the tissue holders would make a fun and unique wedding favor.


At first I thought we'd set them on each guests dinner plate or somehow displayed in the reception area for everyone to take. But then I realized that it'd be kind of weird and random to have a tissue holder on your plate and thought it too boring to have them randomly set out in a basket. That's when I realized the best place for them would be at the ceremony site! What better place for tissue than where people will be crying.

The wedding programs and tissue holders were both made in green and brown (half and half of each color). On the day of the wedding I had my Day-of-wedding coordinator place a brown program and green holder and the opposite (green program, brown holder) alternating on each chair at the ceremony site. Loved the look! The details count!


Wedding programs


Since our ceremony was going to be outside I contemplated making these functional fan wedding programs. I got the idea and found the template for printing them on this website.

The instructions call for one sheet of scrapbook/stock paper but I wanted the fans to be less floppy and more functional so I thought I could easily do this by gluing together two pieces of thick scrapbook paper. One piece was patterned for the back of the fan and the other was plain for the front where the printing would go. It worked in theory but not in application.

First I printed the program on the plain paper, cut each blade out individually with a pair of scissors and then tried to glue the front and back pieces together. I quickly realized that since they were all cut out by hand, the printed piece and back piece did not line up exactly. Then I printed the program on the plain paper, glued that whole piece to the back and then cut the blades out as one. That worked better for the individual blades but still, since I was cutting them out by hand when I put all the blades together the variation between them although very slight was not perfect. I'm sure no one would have noticed that they weren't exactly the same size but it bothered me enough to not use them.

My failure came in trying to make the fan fully functional i.e., stiffer. The whole project is really easy and works really well if you're not obsessed, like I was, with making them thicker. Here's a kit I recently found that have the blades perforated! This would have been perfect for me, since the blades are already pre-cut they would have lined up perfectly when I doubled them up. Wish I would have come across it back then.

In the end I just went with traditional folded wedding programs. They were cute I guess but just pretty boring. Looking back I should have had Dave design a program like the wine labels he did. Now that would have been custom and much more unique!

Here are a few other fan wedding program ideas that I contemplated.